Showing posts with label polymer clay. Show all posts

Sunday, October 8, 2017

How'd It Get to Be Sunday Again?

I must've blinked.

Anyways I've been playing with someone a lot. One of the rare moments she's not in motion.

I finally got to make some practice molds for the mini club workshop last Thursday. I was going to be teaching everyone how easy it is to use 2-part silicone mold kits, so I needed to play with the material first.


Those two little white smudges on the quarter are actually mini piles of rice. Those took a while to make and I'd been waiting to do so when I had molding compound handy. Now I won't have to make them again unless I loose the molds!

We had part of our sewer line back up last week. It happened when the washing machine drained, so that's been fun to clean up. No, not really. Thankfully the water didn't make it into either studio area or two where the computers are set up.

I've been working on the bras for the dancers too. They're coming along nicely. Just need to do fittings and tweak everything before I cut the real fabric. I really should get pictures of the muslins, but I keep forgetting to. Besides, kitten pictures are more fun.

Gotta get back to work. See you next weekend!

Sunday, August 6, 2017

Five Ways from Sunday

That's how my last week has gone. So much to do in short amounts of time. I finished up the sequin encrusted wrap skirt and got it delivered, but I forgot to get a photo of it. Picked up stuff for the next sewing commission in the same trip.

Some how manged to get the samples for the miniature club project whipped together. Total eleventh hour situation there. Also one of the bananas in the bunch has a broken end. Whoops.

We had company come in from out of state for the weekend. Because of critter allergies they opted for a hotel, but I still had to remove copious amounts of dog hair and bits of sequins from the house. I hadn't seen them in forever, so I was really looking forward to the visit.

FuzzyHusband and I took them all around town this weekend. First Friday was in full swing, so our eyes got to feast on beautiful things. For our bellies, we had ice cream from a small, family business. It's our favorite place to indulge. They specialize in interesting flavors. I chose pistachio (my all time favorite) and sweet corn. So yummy!

I didn't take many pictures this weekend because I just plain forgot to. Was having too much fun. Also was being worn out by their child's energy levels. I wish we could bottle it and use it for ourselves once in a while!

Something I did get a picture of are the gorgeous hand-dyed fabrics my friend brought for me. She's always played with dyes, but she's only recently been moving into dying textiles in full force. Aren't they fabulous?

From left to right she used: cochineal, madder root, turmeric, marigold, basil and over-dyed with red cabbage, and blackberries. I'm going to have to come up with a special use for these.

But for now, it's time to put away the second round of dishes from breakfast, get back to the laundry, and think about dinner. See you all next weekend!

Sunday, August 7, 2016

Markers and Minis

Last week was slightly more productive than the week prior. I'm sick right now, thanks to the virus that hid behind a mask of sinus issues that FuzzyHusband suffered with last week. Hence the "slightly" in my previous statement. So whilst I consume fluids and rest, lets got to the fun stuff.

In fun, awesome, and shiney news, I'm now the proud owner of these fantabulous and gorgeous universal stitch markers!!

The loops are 5 and 7 mm for two different sizes of knitting needles and the S-hooks work for marking crochet! The artist who makes them will also do custom work, so you can get the knitting loops in various sizes!

I bought these ready-made because I liked the beads, but he will use any bead colors people want and tailor the sizes to what you need! How cool is that!?!

I'd wondered about the length being fiddly to work around, but it's not an issue. Because they're weighted thanks to the materials, they dangle out of the way nicely. Plus many of my crocheter and knitter streaming friends HIGHLY recommended these markers to me, so I bit the proverbial bullet and ordered a set. SO GLAD I DID!!!

So if you find yourself in the market for a pretty treat and want to try them out yourself, poke this link and you'll be taken to his Etsy shop. I will definitely be ordering more of these, with different sized knitting loops.

On the miniatures front, I pulled out a doll that I started sculpting at a miniature club meeting 2 years ago. Poor thing had a very basic face and the only sculpting tool I had on hand was a bamboo manicure tool. Armed with my regular tools and a better knowledge of making faces, I got her finished!

Hibiscus is a Brownie, the fairy kind that helps people with their housework in exchange for respect and gifts. Most Brownies like either milk or even whisky, but not Hibiscus! She's a needlewoman and loves linen and silk threads.

Hibiscus is the housekeeper for Esmeralda, my witch (who still needs to be sculpted) that has a hat addiction. Hopefully I will get caught up on some projects so I can build Ezzie's house and start furnishing it. Until then, Hibiscus will have to hang out in the studio with me.

I'll get her painted and dressed hopefully this coming week. Dressing her will be a challenge since I want to embroider some details on her clothes. We'll see how it goes. I'm going to take my time and enjoy it.

See you all next week!

Sunday, June 26, 2016

Snakes and Tomatos

I've been playing with clay all week this week. Lots of fun things to share!

Monday was mass producing tomato and "Not Tomato" teapots.


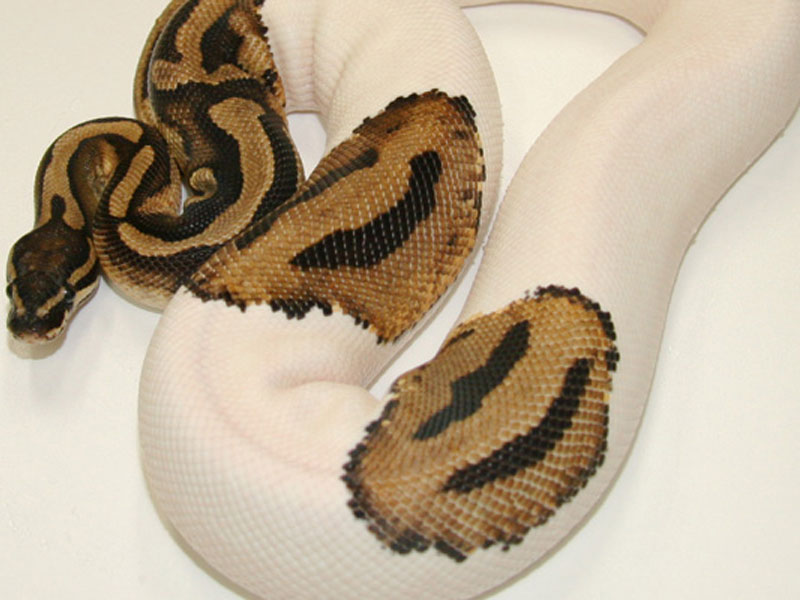
Tuesday marked the beginning of a new sculpting and painting challenge. 1:12 scale ball pythons! They've taken up the rest of my week for the most part. I've been studying up on the different color morphs being bred into/from captive balls and they're quite numerous and even pretty. Thanks to some advice and education from a friend a fellow streamer, I've found myself down an extensive rabbit hole of information.


On Thursday it became apparent to me that I'd lost my mind. These are 1:12 scale ball python hatchlings! Their eyes are 0.5 mm glass beads. Happily I used beads that were already colored. No painting required!

I briefly detoured from snakes long enough to gather up prizes for a giveaway I held on stream Saturday.  I don't normally stream on Saturdays but this was special to celebrate over 200 followers on my Twitch.tv channel. It was so much fun! Instead of only one giveaway chance, I decided to surprise my viewers with a second chance at a prize. Both the plush elephant and the "Not Tomato" teapot will be off to their new homes next week!

On Saturday's stream I started painting the pythons. First up was a gravid (full of eggs) female piebald morph. I say she's gravid 'cause I made her a bit tubby. It works. Photo reference here.


Next up was a smaller male Super Pastel Lesser. (Snake genetics is weird but fascinating!) I'm not super pleased with how his markings turned out, but given this was only my second attempt at painting these types of markings, it's not bad. No, you're not imagining things. Yes, the snake IS pink! If you'd like to see the photo I used for reference, click here.


That's all for now. It's almost 2 am and I'm still winding down from all the excitement.See you all next weekend. I'll probably have a few more pythons painted. Maybe I'll get to a few other things too. Until next time!

Sunday, May 29, 2016

Introducing: Pearl!

I finally ran out of reasons to not try making my first doll! This is Pearl. Pearl came to life when an artist friend of mine announced a contest revolving around a drawing she'd done. The rules were simple: keep the original elements of the drawing and have fun! I couldn't resist the temptation. Twenty people entered and five prizes were awarded last night. The results, including all of the wonderful entries, can be found here. And the other entries are worth ogling. They are all fantastic!


I had little less than a month to come up with concept sketches and put her together. Originally she was suppose to be pulling a wagon with her two stuffed toys in it. 

I wasn't able to finish the wagon in time for the contest deadline, but the most time consuming portion got done. Now I just need to paint the wheels and build the axle assemblies and handle. 

Yes. I lost my mind and designed a wicker wagon! The wheels are O gauge circus wagon wheels. I thought they were pretty and just the right size. I haven't decided on the final paint colors yet, but that is a project for later next week. 

Her plush toys are the original characters in the contest drawing and are entirely polymer clay. The stuffed kitty came out sort of teddy bear shaped, but that's ok. His eyes were sculpted to be buttons. 


The sentient flying marshmallow character (yes, you did read that correctly) also has a button face. I wanted to emphasize the plushness of the wings to be like the wings on stuffed toys I had as a child. 


The same marshmallow character is painted on the balloon. Since the original kitty in the drawing was holding the marshmallow on a string, the idea of the balloon was born.

The balloon was a bit of a challenge. If I had to change one thing about anything I did for this doll, it would be the balloon. It's solid clay, and therefore heavy. I should have made a ball of foil and covered it in clay instead. I do have some of that blue color left, so I may go back and remake it.

Now for details on Pearl! She's a little anthropomorphic kitty girl who is about 7 or 8 years old, based on her height. Her armature is pipe cleaner and she's padded in scraps of quilt batting. - Handy that I have that laying around! - Both of her hands wear sculpted to grip specific objects. Balloon in the left; wagon handle in the right.

Her body has been flocked (it's fuzzy) with flocking I cut myself from DMC Blanc embroidery floss.

She's sporting jaunty silk ribbons on her tail and behind her ear.

Her claws (sheathed) are "painted" to match her outfit. I used micro no-hole beads for the tips of her nails. Their color bled a bit in the oven, but I was able to hide that with flocking.

The details of her face were painted prior to adding her fur.

Her clothes are made from a current line of Moda quilt cotton and some blenders I found at the quilt shop. She's wearing pantaloons because, well, you know people always turn them upside down!

As for her name, I thought it was fitting to name her after my late friend, Pearl Jordan, who I had the pleasure of knowing through our miniature club but I didn't know long enough. She'd encouraged me to start trying dolls years ago after she saw some of my other clay minis. I wish she was here to see what I've come up with.

Sunday, May 22, 2016

Running Late But I'm Here!

Sorry I'm so late posting today. I actually forgot it was Sunday and started piecing some quilt blocks this morning. Then FH went on a 30-mile bike ride and ended up needing me to come and rescue him. ;-)

So over the last week I finished a couple more bunny sculpts and finally made one I was happy with. All three are now painted and waiting to be flocked.

The color patterns for the seal point and grey/white bunnies came from a bunny calendar I had handy. Next up for them: dotting the eyes with gloss varnish and flocking the bodies so they're fuzzy.

I started making the flocking on Friday night and got about a third of the way through before my right index finger went numb. Apparently my scissors handle was too small and resulted in a pinch nerve. It's getting better, but typing is a tad fiddly.

There is an advantage to making my own flocking. I can create "tweeded" colors that are blends to help the fur look more natural. Plus I can get any shade I want, instead of being limited by what's available commercially.

Since these got finished before I started the blog post, I'm including them. Another Twitch streamer is collecting blocks for a Quilt of Valor project. I thought it would be fun to participate, so here's what I came up with.

Counterclockwise, starting at the top left: Single square with appliqued star; bow tie; 9-patch variation; snowball; and a flag. I played around with the flag design to take advantage of the fun fabric designs.

That's all for now. I've got some more sewing to do and I need to work on cutting flocking some more. See you all next week!

Sunday, April 17, 2016

Teapots, Hatboxes, and Crocheted Hats

Last week was pretty good on and off stream. It feels really good working in my remodeled studio space. There are still some areas that need decluttering and some tubs of supplies to go through and whittle down, but so far I'm really relaxed in there.

Monday I continued working on teapots. Mostly because I wanted to try adding vine-like details and leave to the tomato teapots. I tried a few different variations and I think I've settled on an arrangement that I prefer. I'm thinking of one more change I'd like to make and then I'm start a production run of them.

For fun I showed how to make a marbled set of colors and made some teapots out if it. I did some solid ones too.


Tuesday I switched gears from clay and went to work on some prototype hexagonal hatboxes for next month's mini club meeting. Another member is teaching round hatboxes and I found this hexagon version in an issue of American Miniaturist. We're going to split up the members and this way everyone can learn both with more hands on instruction. I need to briefly jump ahead to Thursday for this part as well. Bear with me. ;-)


From left to right:

(Tuesday) Light green scrapbooking paper with regular paper template foundation. - It worked alright. Not too stiff when bending the paper into shape. The lid is a little loose though. I covered it with some antique lace on the sides.

Rose colored cardstock with regular paper template foundation. - This one was a little thick and harder to fold into shape. Loose lid again. It's not bad though. I used more antique lace on it.

Cream colored (striped) wallpaper sample with regular paper as foundation. - Again this one worked well. It was also a bit easier to fold than the cardstock. It got trimmed in silk ribbon.

Black and white cotton fabric with regular paper foundation. - I liked the way the cotton folded into shape. But the plain paper foundation wasn't very sturdy. The lid isn't quite as loose. Trimmed in pink silk ribbon... because "sassiness."

(Thursday) Teal cotton fabric and cardstock foundation. - This combination worked the best.  The lid fits perfectly too.

Blue silk with cardstock foundation. Gluing the foundation to the fabric (per instructions) led to some bleed-through of glue. Also the foundation paper shows at the corners.  I'm thinking if I cut things differently, that issue can go away. Not sure what to do about the glue since even using as little glue as possible showed badly.

But for this one, I covered the corners with silk ribbon and hid the massive glue stain on the lid with lace, silk roses, and no hole beads.


Back to Wednesday, I'd forgotten to print out the hatbox templates on cardstock and neglected to press my silk, so I constructed some tools for miniature millinery.


Of course the rose tool was tested out.

I also started a crocheted cloche hat. I found the pattern in a miniature magazine.


I finished it later that night. Wasn't too pleased with it, but we'll see how it turns out after it's blocked and stiffened.

It will be decorated in part with some miniature faux blackberries I made from no hole beads.

For fun on Friday I started my own cloche pattern. I got it mostly done and figured out I'd decreased too much at one point and had to frog most of it.

I need to get back to real life house work for now, so I'll leave you with a picture of Mercedes post-bath on Friday. She's gorgeous and she knows it!

Sunday, April 10, 2016

Playing with Clay

FH and I got home late last Monday and I was knackered. I also had no plans for my streams Tuesday and Wednesday. I'd been thinking up a new sculpted teapot design in the car, so I decided on just playing with clay and seeing where things took me.

Whilst rummaging for colors, I found some pre-mixed "dough" colors leftover from workshops I'd taught and decided they needed to be used up as well.

 The first thing I played with was a cane for candies and cake decorations. I attempted a strawberry design. It's... ok. I'm not super happy with it. The design itself was not well planned out and the result is "meh" in quality. I can do better, so that one is going where it should've gone first. The sketch pad. Also I don't know if the clay had started to dry out or if it was just really cold in my studio, but I was having problems with my canes cracking and breaking apart as I was working them to make them smaller.

After I got fed up with the cane foolishness, I switched to my prototypes for new teapots. The center tomato is plain. The other two are based on one of the emote designs E-Jipt uses in his Twitch channel. It's a "Not Tomato." Long story. The gloss varnish and the sunlight weren't playing nicely and this is the best picture I have of them. The tomato teapot itself still needs tweaking. Also I'd like to make them a bit smaller.

The leftover bits of cane got the teapot treatment as well. Also some of it got turned into lollipops.


Wednesday was "baking day." I started out making a simple split-top loaf and a braided loaf. Then I decided to try marbled rye. I'm pretty pleased with that experiment. The rye can use some tweaking, but this is a good first result.

Various dinner rolls followed as did cookies in different states of preparation.


While I was working, a viewer asked how I'd made the tomato teapots the day before, I so made another to demonstrate. And E-Jipt suggested a Pokemon-themed teapot while I was working so I tried that as well.

The tomato teapot has more detail than the first versions. I added more vine details and am happier with it. The Pokeball teapots... not so much. They're too big and clunky for one. I turned one into a cookie jar as it looks better size-wise. Also the red smeared everywhere on the white bottoms. So they get to join the strawberry cane back at the drawing board. I may end up making the two haves of the Pokeballs separately and "gluing" them together with liquid polymer after par-baking them. Just to keep the red from staining the white. I'm not sure yet. But it's a neat project idea to play with.

Thursday night was the mini group meeting and we all made the Plein Air set from True 2 Scale's tutorial. That was a lot of fun. I'd made mine already so I could help everyone else figure their out.

The next several meetings will be all hat shop oriented. Hatboxes are next month, but I'm not teaching that one. However I need to make some tools for making silk roses and start practicing a hat design people liked. Unless I'm complete rubbish at it, that will be June's project. We go out for dinner in July, but I'm going to suggest having an all-day play day in July sometime. Don't know how that will go. 

That's all for today. I need to go sketch up some cane designs and start research mini hat shop items. See you next Sunday!