I've been putting together a tutorial for minis to share with some friends. I thought I'd share it here because it's lots of fun and it was a creative project.
First I'll get the stitching photos out of the way. I'll link to the previous week's images in the name for easy comparison.
Black Bear is coming along nicely.
I did get the background trees in the middle of the piece going this week. I also finished a chunk of clouds in the sky and started on the tops of the foreground trees on the right side. The bear's face got filled in too... because I got tired of seeing a faceless bear.
The Aragon Blackwork did get the lower right motif outline in place this week, and its surrounding crosses. I also stitched the right side pattern, started the upper left motif, and purchased a larger frame to make it easier to work on.
Now for the tutorial! Here's how to make mini bolts of fabric and fat quarters.
You will need:
- pieces of thick cardstock, I used the backs off legal pads, cut to 7/8 of an inch by 2 inches. I painted the ends of my bolts white, but that's optional.
- strips of appropriate fabrics 4 inches by 22 inches; if you're cutting from a fat quarter, just cut a 4" piece the length of the fabric.
- scissors for paper and fabric (a rotary cutter and mat would make things go faster)
- a ruler
- tacky glue
- clothespins for clamps
Fold your fabric strip in half, wrong sides together, so that you have a rectangle 2" x 22". Put some glue on your bolt .
Press one end of your fabric to the bolt and begin tightly wrapping fabric around the bolt.
When you've reached your desired thickness, trim the remaining fabric off (save it for cutting fat quarters!), fold over the cut end, and glue it to the bolt.
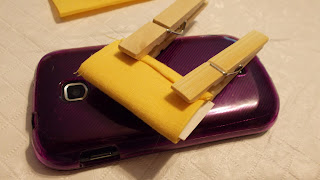
Clamp in place with clothespins.
As a note, if you have a light fabric and don't care for the dark card showing through or didn't want to bother with painting ends, use a white piece of card instead. I had a small white piece that came folded inside a real life fat quarter, but only one piece. That's why I opted to paint the ends of brown card.
For the fat quarters, neatly stack your leftover ends from the fabric bolts. Cut two inch strips first.
Then cut 1.5 inch pieces off of those strips.
This way to can create multiple fat quarters at once! It saves time.
Another note, I folded one mini fat quarter into a small square, like they come at JoAnn's and some other fabric stores. You could also fold the fat quarter in half, roll it, and tie it with a piece of thread.
Maddie and Nugent decided they would pose with some finished bolts. If you poke the photo, Nugent is peeking out from around the bolts on the left.
I have many more bolts to make since I've got a mini quilt shop in mind. There will also be baskets to display folded and rolled fat quarters in eventually.
I hope you've enjoyed the tutorial. It was nice to play with minis again... it's been too long. See you next week!


.JPG)
.JPG)
.JPG)

.JPG)


1 comment:
Thank you for this tutorial. It will be very useful.
Hugs, Drora
Post a Comment