Monday, February 28, 2011

Some of the Current Panda Ideas

I spent a couple of hours trolling the internets for nursery ideas.  These are a few items for real life nurseries that I found.

This is just awesome.  I'm not sure if I'd sculpt the parts in clay and then flock them or use fabric and sew them.  He looks so hugable!  I wish I had one big enough to fight me.
 I'm not sure I like this rug.  It looks more like panda roadkill.  But maybe doing something like this and filling it with stuffing to have a panda bear that a child could nap on?  I've seen stuffed toys like that in catalogs before.
Before I show the lamp ideas I want to mention the roombox I chose has a clear top, which takes away the need to electrify the room.  Not everyone is wiling to rearrange their homes so a "toy" can reach electricity.  I might look into a couple of those new LED lamps on the market, but only if my friend wants to go that route.  So for now all lamps would be non-working.

 I think this is the better of the two lamps.  The panda and ball could be easily made from polymer clay or even beads.  A bit of paper or fabric with trim for the shade...
 This lamp idea could be cute if I found the right bead or sculpted a more cartoonish panda from clay.
What do you think folks?

I should have the trial run height chart done and have pictures Tuesday.  I wasn't sure which fabric to use so I'm doing one on each and I'll see what fits the room best.

Sunday, February 27, 2011

Stitching in Two Scales

Yesterday I went to my semi-local and well loved needlework shop to get some Hardanger fabric in 22-count.  I also came home with some fibers.  As you read this I've started stitching a panda bear themed height chart.  I will take pictures when it's done.

Hopefully pictures of Rose Cuttings and a mini piece I stitched on Friday (for me just because) will tide you over until Monday.

Here's Rose Cuttings.  I was able to get a few stitches in whilst visiting with the proprietor of my LNS.
 This will be a 1/12 scale bell pull once I decide how I want to finish it.  The first picture is how much I got done Thursday night while waiting for FH to decide he'd surfed the 'net long enough.
 This picture is the completed design as of Friday evening.
The design is from From Our Dollhouse...To Yours by Jeanne Bowers and Janet Martin.  Sadly the book is out of print but a Guild member gave me a stack of needlework for miniature books a few months ago.  Otherwise I'd have never known about it.

Saturday, February 26, 2011

Why I Couldn't Say No-Letting Off Some Steam

A few of my real-life friends already know about this, because I had to vent my frustration and get some creative input on this mad scheme.  I haven't pounded my virtual head against the proverbial wall on Facebook yet either because I've been so busy with guild things.  This will be a very brief description of a project I find myself in the beginnings of that I really, really don't want.  But I couldn't say no.

I took Serenity's Nursery to a Guild meeting on Monday to show her grandma, who just happens to be a fellow stitcher and someone I'm trying to bring over to the mini dark side.  Everyone loved it and many "oohs and ahhs" were crooned.  Until one particular lady saw it and burst into tears.  Her first grandchild (a girl) was born in December and has a rare condition (I don't know the name and will not share the details) that will give her two years or less to live.

In a wash of tears she asked if I would take a commission to build a mini nursery for her granddaughter.  She also spilled all the sad details about the baby's health, which I had already heard from other Guild members.  This woman is my friend.  She has a heart of gold bigger than Texas and life is being unfair.  I could not say no.  I was wishing I'd left the room at home though.

I figured, ok... I have lots more pink things around.  Another cradle is easy... I can make it a bit bigger than Serenity's...  I was figuring I could go home and get one done in about a week, then get back to my other projects.  You know... the ones with deadlines.

And then she dropped the other shoe.  Could I make it in greens and blues with panda bears?  Because that's what her room is done in.  A room she doesn't get to use and may never use.  Oh hell.  Right.  Yeah I can do that.  Whilst I'm rapidly thinking, yeah I can do that if given weeks and months, not days.  Hmmm....

So I thought fast and said if I'm going to do this, I'm going to do it right and that it may take time since panda-themed things are impossible to find.  She was find with that.  Then instead of working on Rose Cuttings while it was in my hands my mind was racing, coming up with ideas for this room.  All the details that I had put into Brenna's Nursery would be a must.  

That night any hope of making my own wallpaper borders were dashed when I could not find anything that would work online.  Then I started thinking about a mural on the walls instead.  I found a really cool example in a real life child's room.  But I am not 2-D artist.  Ok so I'll make a background and find rubber stamps of bamboo and pandas.  Then I can paint inside the outlines.  That how I painted the potato and onion bin.  

I ran that idea by a friend the next day (who is a 2-D artist) and she's offered to paint the mural herself.  Yay!  She is a mutual friend of this Guild member and hadn't heard the sad details yet.  Ok so that problem was solved.  Then we moved on to the room structure itself.  The three of us at the table all agreed that perhaps I should get an actual roombox instead of using a bag.  The bags are great but if she wants to move it around and even take it to her son's home in a different state it might not hold up too well. 

I think it dawned on all of us that I wasn't making this room for a dying infant.  I am making it for a grieving grandmother as a keepsake.  My head started buzzing with more ideas at that point.  
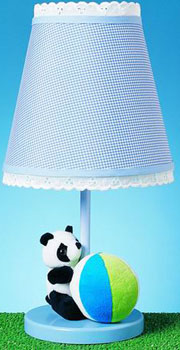
I'll need to crochet a blanket....  I can resign the growth chart in Brenna's Nursery as pandas...  The teddy bear ornament Cathy taught me to make!  I can just do a head and turn it into a hobby horse type toy...  I'll need to dig out the polymer clay and start making pandas; maybe flock a larger one and make tiny ones for decorations on things.  I could put a tiny one on a lamp!  

So now while I should be finishing the Guild website, finishing Rose Cuttings, finishing FH's Black Bear cross stitch, working on my Porch, and doing a few small stitching projects for the upcoming Judged Show in April, I've got pandas and a sick baby on my mind.

Sorry for the rant.  I really needed to get that out.  That being said, if any of my mini friends around the world have ideas, suggestions, panda themed minis for sale... anything that will help.  Please let me know. 

Wednesday, February 23, 2011

Halfway to the Weekend

No pictures today.  Everything that's current on the camera is someone else's work.  I've spent the last three days taking pictures of Guild members' projects for the website.  In fact I just got home and put dinner in the oven.  Thank the heavens for take 'n bake pizzas and pre-washed lettuces.

I'm utterly spent.  Tomorrow I have one more Guild meeting, but no more personal "home" appointments.  Those take the longest.  I drive over to a member's home and we go through all their work (or all they can get their hands on), make a list of titles and dates, and I take pictures.  Lots of pictures.  Fours pages of single-spaced titles and dates on a 5"x8" notepad.

There are only a couple more people who are going to have me come to them (and their collection) that I know of.  Most members aren't as prolific with projects and a few are taking their own pictures and burning them to CD for me.  So yeah... I'm hoping I can get back to my own projects tomorrow or Friday.

I'm going to go collapse now.

Tuesday, February 22, 2011

My Order Arrived!

When I got home from most of my running yesterday my order from miniatures.com had gotten here.

I put the kick plate and mail slot on the door.  Don't worry about them being crocked.  I fixed that as soon as I saw them in this picture. 


 I still need to find the "safe place" I stashed the door knobs...

Now off to more Guild things.  In case I haven't mentioned it before, I'm the new webmaster (I prefer webmistress)for the Guild.  For the last several weeks I've been coding, photographing (then altering), and debugging the new website.  New in every way since we've never had one before and I'm building it from scratch.  

The point being I've been fairly distracted with it for a while and that's the main issue with me getting to do any fun projects.  Once it goes live towards the end of March (I hope) things will calm down again.

Monday, February 21, 2011

Another Old UnFinished Object-Now Finished

This time it's a piece of mini stitching.  It predates me meeting the local mini group back in college.  I was given the kit by a lady in one of my history classes.  We were partners for a class project and when I was at her house I saw her amazing dollhouse.  She had one of these "Welcome" mats finished at the front door.

When the semester was over she invited me back over for a wine, chocolate, and mini party.  We had a lovely time and came away with some duplicate things she had kicking around in her stash.

The rug never got finished back then because the finishing instructions were just too strange.  I thought I'd understand them better now since I've had more stitching experience and whatnot.  I was sorely mistaken.

After puzzling through them unsuccessfully for 30 minutes I said, "(insert choice expletive here) this.  I know Casey doesn't do it this way.  There's probably a reason."  Off I went to Casey's blog and I was right.  She finishes mini needlepoint rugs this way.

The first thing I did was to stitch another round of border.  It didn't look finished enough before.  In fact in that picture above you can see that I forgot to take a "before" picture until after I'd started the new border.
So here it is after 15 or so years of being unfinished:


Thanks, Casey!  :-)

I plan on doing at least one more in the hopes that I can show my tension has improved with time.  But somehow it just didn't seem right letting this one remain a UFO.

Some of you may be wondering when I'm going to get around to the curtains I mentioned on Sunday.  Well it's still Sunday night... I'm writing this post to update on Monday afternoon whilst I'm uber-busy with Guild things.  The fabric for said curtains is in the washing machine and is headed for the dryer in about five minutes.  I plan on trying out the curtain instructions at the meeting tomorrow.  I'm also trying out this "schedule a blog post" thing for the first time, so I apologize if it doesn't work correctly.  If it works I'll try to utilize it more in the future so I can blog more often again.

Sunday, February 20, 2011

More Interior Touches

I dug out an old Chrysnbon kit a few days ago and put together/painted three pieces for the interior of the Porch scene.  I kept everything plain, plain white because of the busy wallpaper pattern in the room.
 
 The spoon rack/planter needs some ivy spilling out of it, so it's not in place just yet.  A friend of mine is going to loan me her ivy punch tomorrow so I can make some leaves.

 However the clock is in place above the butterfly aviary. 
 And the wall mounted coat rack is hanging on the wall just inside the front door next to what I imagine is the door to the garage.
I was counting birds for the Great Backyard Bird Count this weekend, so I don't have much else to show.  I did do some reading on window treatments and I believe I'm going to try my hand at some net curtains for the windows.  They look bare from the outside, but I don't want too much blocking the view of the interior.  Net and lace might be the ticket.  We'll see how that goes.

Saturday, February 19, 2011

Serenity's Nursey- Finished

When I left off yesterday the remaining construction was cutting 1/2" strip wood to cover the top edges of the foam core (so when someone looks in from the top they see painted wood instead of foam core edges) and cutting plexi-glass to fit in the two openings.

While the paint on the wood strips dried I cut the plexi-glass and rounded the corners with wire cutters and a sanding block.  It's really a good idea to do this because the corners can tear the paper bags.

I opted to not use some of the things I had on the walls in favor of ordering a wallet size print of the baby just minutes after her birth.  The frame is made from mini chair rail that I had on hand.  The cradle and high chair were decorated with scraps of the wallpaper.  Oh and I painted the inside of the bottle white.


Now I just need to clean up from this project and head back to my Porch.

Friday, February 18, 2011

Interlude Project - Serenity's Nursery

A friend of ours had a baby last month and it's taken me this long to find the right gift bag to build a miniature in for her.  I started this yesterday with the intention of finishing it for the blog post, but said friend brought the baby over to play in the afternoon.  A surprise visit even.  Needless to say I was sidetracked.

For anyone unfamiliar with making a room inside a gift bag, there is a fantastic tutorial over on my friend, Fay's, website.  Please go there for the details if you're interested in trying one for yourself.  I learned this from her.  If you'd live to peek at her miniature work, follow this link over.  You know you want to!

The following picture-heavy post contains no measurements.  If you want to try this, please visit Fay's tutorial. (link above)  In fact having these pictures and her tutorial open together might be helpful if, like me, you relate to pictures better than text.

First I cut a hole in the bag.  (I found the bag at a Hallmark store.  They had blue ones too.  I think I'm going to go back and grab a few more of each for my stash.)

 
 Then I measured everything and cut a piece of foam core to fit.
 
 Note the foam core is all one piece with "hinges" cut to allow the sides to fold.
 
 Then I started papering the walls.  I used scrapbook paper that I sprayed ahead of time with a matte fixative spray and left to dry.  This helps protect the paper.  I used spray adhesive to glue the paper down.  A water-based glue like Yes", Alaine's, or Elmer's would warp the foam core.  The middle section was papered first, with some overlap on the sides.
 
 Then I papered the sides.
 
 The floor is just a piece of Styrofoam that I cut to fit inside the walls.  It's also covered with scrapbook paper that I sprayed beforehand.  However I just used tacky glue to glue in place.  Incidentally the two patterns of scrapbook paper were from the same "baby girl" themed collection, so they were already coordinated for me.
 Here is the walls and floor in place.  I used T-pins to hold them together while the glue (regular tacky glue again) dries.
 I painted the baseboard ahead of time (along with the intended furniture) and put it in place next.
 I still have some work to do today, but here is a shot of some of the things going inside the room.
 

 I'm off to finish this up and then get back to the Porch.  My order from miniature.com won't be here until Monday but I can at least finish the stonework and maybe ponder a new roof.

See you later!

Tuesday, February 15, 2011

One More Addition-Reviving A Long-Forgotten UnFinished Object

And I think that the Shabby Chic Shop it completed (for the moment) now.  I found a forgotten, neglected, and unfinished Chrysenbon clock kit in my stash.  I had painted it pale yellow and tried (valiantly) to paint ivy on it.  Needless to say that failed miserably and it sat in my stash for the better part of a decade incomplete and unloved.  The brass cover for the pendulum had vanished somewhere in that time.  Apparently I had decided to no use the brass piece that the clock face is supposed to sit in.  Instead that sticker was directly on the plastic.  Happily it came back off and the brass clock front had not joined the pendulum cover.  Here's what it looks like now.  I must apologize for not taking a "before" picture.  It was late at night when I finally found it and by then the plan just took over.

When I found it again I rubbed a light coat of gesso over the original paint and then wiped it off.  I only wanted to tone down the previous colors.  Then coated the whole thing in a thick coat of crackle medium.  After ten minutes or so I slathered on some white paint.

When that was dry I dry-brushed a little bit of pink onto the sides and decorative edges.  Then I reattached the clock face in the brass cover and glued it in place.  A rare stroke of genius told me to glue a sea shell in place of the brass pendulum cover. 

So now it is finished, loved, and in place.
 Once I finish catching up on real housework I'll get back to the Porch.  I'm waiting on an order from miniatures.com with some necessary bits in it but there's still plenty to do without it.  My mom was here for four days, so I'm running behind with getting things back in order.  She's an enabler... I pointed at a roombox kit in the HBS catalog and told her my idea for it and she handed me money to order it.  *sigh*  One more project in the pipeline now....

Hopefully I will have something to show you tomorrow or Thursday.  See you then! 

Monday, February 14, 2011

Thursday, February 10, 2011

New Additions

I was rummaging around my stash in search of possible bits for the Porch and found some treasures.  But not for the Porch... for Shabby Chic. [link goes to most resent incarnation]

The yellow chair and table were pieces that I repainted when I was still in college.  It was a club project and they never had an intended home.   Fitting them into the room required some rearranging, but I think it turned out well.  I added a couple of small bits (a shell, a chunk of amethyst, and a basket of flowers) to keep the "cluttered" look of the place.


I still need a couple more things for the walls, but I know there are more hidden treasures in the stash somewhere.  I just have to keep searching.  In all the excavating I did find some bits for the Porch.  But those are for another post.  I have to head out to a Guild meeting.  See you later!

Wednesday, February 9, 2011

I Knew They Were Coming So I Baked A Cake - Fun and A Review

Last night the Counted Thread (cross stitch) group from Stitchers' Guild came to my house for a meeting.  Because it's February and because I love red velvet cake I wanted to do something special for our treat.

FH bought me a really cool cake pan from Wilton.  It's their "Heart Tasty-Fill" design that creates a heart-shaped void to fill with yummy frostings/creams.  I opted for their suggestion of red velvet filled with raspberry (included in the recipe book in the box) and set to work.

Here you can see the result after baking.  The layer on the left is the bottom half.
 
Delicious raspberry cream.

At this point I put the cake in the refrigerator to chill while I made the frosting.
The frosting turned out a little too sweet for FH and I, and there was quite a bit leftover.  I think I will use less sugar next time and see if that works better.  However the ladies all loved it.  I kept the decoration simple.
Sadly by the time I got a piece of my own the structural integrity of the heart center had failed.  But I have ten witnesses to the fact that their pieces all had gorgeous hearts in the middle.
I can't wait to use this again.  Maybe chocolate with creme de menthe next month when the Surface Stitchers (embroiderers) are here.  There are only three ladies that belong to both groups, including myself, so I doubt there would be complaints if I repeat myself a bit.


---   ---  ---
PS: I got the comment issue fixed so I'd love to start hearing from folks again! :-)

Monday, February 7, 2011

Who Needs A Plumb Line When You've Got Scissors!

Not me anyway. What I need are more egg cartons.  Happily I have a lead on where I can get a few more (minus the eggs) soon.


Castor and Maddie had a bit of a disagreement earlier today.  He decided to "snoop-ervise" while Maddie was evaluating some outdoor minis from my stash.  Apparently she decided he got a bit too close to the items in question. 

 She yelled at him and ran to the door, but all that did was make him more curious.
 Finally he was bored with his findings and he wandered off.
 Maddie decided to move everything further up onto the porch for safe-keeping.  She's trying to coax that little bird into coming inside where it's safe.  I don't think the bird wants to be inside and is more curious as to what Maddie's doing with his house.

One of the minis I unearthed over the weekend is this wheelbarrow planter I made years ago.  I don't know if it will stay on the porch or go back into a box for now.  However for the moment I'm going to enjoy it.
 Hopefully I can get the additional egg cartons soon and finish the stonework.  Oh and for anyone who's interested, pop over to Casey's blog and see her tutorial on egg carton stonework.

Giveaway At "Every Little Thing"

The blog "Every Little Thing" is hosting a giveaway for the blog's two year anniversary.  Here's the fun part: we have to name a pet crayfish.  Yes you read that right.  ;-)  Hop on over and join the fun!

Friday, February 4, 2011

A Trifecta of Progress

First here's my progress on Rose Cuttings.  I've been slack in taking my usual progress pictures every day.  I figure the actual stitching is more important than a nightly picture.

 
I'll be stitching more on it later.  I'm hoping to get the last leaf and the rosebud finished.  Then I can do more of the background shading and the yellow rose.

Tonight I finished both the interior trims and the faux slate on the Porch.


I also put together the skeleton of some steps that will lead up to the Porch.  Tomorrow I plan on starting to cover them and the base with faux stonework.  The step under the door needs some kind of detail work too.  At some point I need to make a chair to put inside the room.  There will be an order from my favorite mini supplier in the works soon.  My mini lumber yard is fairly depleted and I'll need so sort of porch railing.

Then since I finally found the last bit of my rose fabric for the second valance in Shabby Chic I got the window treatments done and installed.


If you look closely at the second window you'll see one of the signs Katie made for me.  Thanks again, Katie!